Having built the core of my own “dumb” smart home system, I have been working on making it smart these past few years. As I’ve written about previously, the smart side of my home automation is managed by Home Assistant, which is an amazing, privacy focused open source platform. I’ve previously posted about running Home Assistant in Docker and in Podman.

I do have a couple of proprietary home automation products, including LIFX globes and Google Home. However, the vast majority of my home automation devices are ESP modules running open source firmware which connect to MQTT as the central protocol. I’ve built a number of sensors and lights and been working on making my light switches smart (more on that in a later blog post).
I already had experience with Arduino, so I started experimenting with this and it worked quite well. I then had a play with Micropython and really enjoyed it, but then I came across ESPHome and it blew me away. I have since migrated most of my devices to ESPHome.

ESPHome is smart in making use of PlatformIO underneath, but its beauty lies in the way it abstracts away the complexities of programming for embedded devices. In fact, no programming is necessary! You simply have to define your devices in YAML and run a single command to compile the firmware blob and flash a device. Loops, initialising and managing multiple inputs and outputs, reading and writing to I/O, PWM, functions and callbacks, connecting to WiFi and MQTT, hosting an AP, logging and more is taken care of for you. Once up, the devices support mDNS and unencrypted over the air updates (which is fine for my local network). It supports both Home Assistant API and MQTT (over TLS for ESP8266) as well as lots of common components. There is even an addon for Home Assistant if you prefer using a graphical interface, but I like to do things on the command line.
When combined with Home Assistant, new devices are automatically discovered and appear in the web interface. When using MQTT, the channels are set with retain flag, so that the devices themselves and their last known states are not lost on reboots (you can disable this for testing).
That’s a lot of things you get for just a little bit of YAML!
Getting started
Getting started is pretty easy, just install esphome using pip.
pip3 install --user esphome
Of course, you will need a real physical ESP device of some description. Thanks to PlatformIO, lots of ESP8266 and ESP32 devices are supported. Although built on similar SOC, different devices break out different pins and can have different flashing requirements. Therefore, specifying the exact device is good and can be helpful, but it’s not strictly necessary.
It’s not just ESP modules that are supported. These days a number of commercial products are been built using ESP8266 chips which we can flash, like Sonoff power modules, Xiaomi temperature sensors, Brilliant Smart power outlets and Mirabella Genio light bulbs (I use one of these under my stairs).
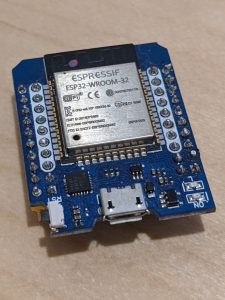
For this post though, I will use one of my MH-ET Live ESP32Minikit devices as an example, which has the device name of mhetesp32minikit.
Managing configs with Git
Everything with your device revolves around your device’s YAML config file, including configuration, flashing, accessing logs, clearing out MQTT messages and more.
ESPHome has a wizard which will prompt you to enter your device details and WiFi credentials. It’s a good way to get started, however it only creates a skeleton file and you have to continue configuring the device manually to actually do anything anyway. So, I think ultimately it’s easier to just create and manage your own files, which we’ll do below. (If you want to give it a try, you can run the command esphome example.yaml wizard which will create an example.yaml file.)
I have two Git repositories to manage my ESPHome devices. The first one is for my WIFI and MQTT credentials (this is private and local, it is not pushed to GitHub), which are stored as variables in a file called secrets.yaml (store them in an Ansible vault, if you like). ESPHome automatically looks for this file when compiling firmware for a device and will use those variables.
Let’s create the Git repo and secrets file, replacing the details below with your own. Note that I am including the settings for an MQTT server, which is unencrypted in the example. If you’re using an MQTT server online you may want to use an ESP8266 device instead and enable TLS fingerprints for a more secure connection. I should also mention that MQTT is not required, devices can also use the Home Assistant API and if you don’t use MQTT those variables can be ignored (or you can leave them out).
mkdir ~/esphome-secrets
cd ~/esphome-secrets
cat > secrets.yaml << EOF
wifi_ssid: "ssid"
wifi_password: "wifi-password"
api_password: "api-password"
ota_password: "ota-password"
mqtt_broker: "mqtt-ip"
mqtt_port: 1883
mqtt_username: "mqtt-username"
mqtt_password: "mqtt-password"
EOF
git init
git add .
git commit -m "esphome secrets: add secrets"
The second Git repo has all of my device configs and references the secrets file from the other repo. I name each device’s config file the same as its name (e.g. study.yaml for the device that controls my study). Let’s create the Git repo and link to the secrets file and ignore things like the builds directory (where builds will go!).
mkdir ~/esphome-configs
cd ~/esphome-configs
ln -s ../esphome-secrets/secrets.yaml .
cat > .gitignore << EOF
/.esphome
/builds
/.*.swp
EOF
git init
git add .
git commit -m "esphome configs: link to secrets"
Creating a config
The config file contains different sections with core settings. You can leave some of these settings out, such as api, which will disable that feature on the device (esphome is required).
esphome– device details and build optionswifi– wifi credentialslogger– enable logging of device to see what’s happeningota– enables over the air updatesapi– enables the Home Assistant API to control the devicemqtt– enables MQTT to control the device
Now that we have our base secrets file, we can create our first device config! Note that settings with !secret are referencing the variables in our secrets.yaml file, thus keeping the values out of our device config. Here’s our new base config for an ESP32 device called example in a file called example.yaml which will connect to WiFi and MQTT.
cat > example.yaml << EOF
esphome:
  name: example
  build_path: ./builds/example
  platform: ESP32
  board: mhetesp32minikit

wifi:
  ssid: !secret wifi_ssid
  password: !secret wifi_password

logger:

api:
  password: !secret api_password

ota:
  password: !secret ota_password

mqtt:
  broker: !secret mqtt_broker
  username: !secret mqtt_username
  password: !secret mqtt_password
  port: !secret mqtt_port
  # Set to true when finished testing to set MQTT retain flag
  discovery_retain: false
EOF
Compiling and flashing the firmware
First, plug your ESP device into your computer which should bring up a new TTY, such as /dev/ttyUSB0 (check dmesg). Now that you have the config file, we can compile it and flash the device (you might need to be in the dialout group). The run command actually does a number of things, include sanity check, compile, flash and tail the log.
esphome example.yaml run
This will compile the firmware in the specified build dir (./builds/example) and prompt you to flash the device. As this is a new device, an over the air update will not work yet, so you’ll need to select the TTY device. Once the device is running and connected to WiFi you can use OTA.
INFO Successfully compiled program.
Found multiple options, please choose one:
  [1] /dev/ttyUSB0 (CP2104 USB to UART Bridge Controller)
  [2] Over The Air (example.local)
(number):
Once it is flashed, the device is automatically rebooted. The terminal should now be automatically tailing the log of the device (we enabled logger in the config). If not, you can tell esphome to tail the log by running esphome example.yaml logs.
INFO Successfully uploaded program.
INFO Starting log output from /dev/ttyUSB0 with baud rate 115200
[21:30:17][I][logger:156]: Log initialized
[21:30:17][C][ota:364]: There have been 0 suspected unsuccessful boot attempts.
[21:30:17][I][app:028]: Running through setup()...
[21:30:17][C][wifi:033]: Setting up WiFi...
[21:30:17][D][wifi:304]: Starting scan...
[21:30:19][D][wifi:319]: Found networks:
[21:30:19][I][wifi:365]: - 'ssid' (02:18:E6:22:E2:1A) ▂▄▆█
[21:30:19][D][wifi:366]:     Channel: 1
[21:30:19][D][wifi:367]:     RSSI: -54 dB
[21:30:19][I][wifi:193]: WiFi Connecting to 'ssid'...
[21:30:23][I][wifi:423]: WiFi Connected!
[21:30:23][C][wifi:287]:   Hostname: 'example'
[21:30:23][C][wifi:291]:   Signal strength: -50 dB ▂▄▆█
[21:30:23][C][wifi:295]:   Channel: 1
[21:30:23][C][wifi:296]:   Subnet: 255.255.255.0
[21:30:23][C][wifi:297]:   Gateway: 10.0.0.123
[21:30:23][C][wifi:298]:   DNS1: 10.0.0.1
[21:30:23][C][ota:029]: Over-The-Air Updates:
[21:30:23][C][ota:030]:   Address: example.local:3232
[21:30:23][C][ota:032]:   Using Password.
[21:30:23][C][api:022]: Setting up Home Assistant API server...
[21:30:23][C][mqtt:025]: Setting up MQTT...
[21:30:23][I][mqtt:162]: Connecting to MQTT...
[21:30:23][I][mqtt:202]: MQTT Connected!
[21:30:24][I][app:058]: setup() finished successfully!
[21:30:24][I][app:100]: ESPHome version 1.14.3 compiled on Mar 30 2020, 21:29:41
You should see the device boot up and connect to your WiFi and MQTT server successfully.
Adding components
Great! Now we have a basic YAML file, let’s add some components to make it do something more useful. Components are high level groups, like sensors, lights, switches, fans, etc. Each component is divided into platforms which is where different devices of that type are supported. For example, two of the different platforms under the light component are rgbw and neopixelbus.
One thing that’s useful to know is that platform devices with the name property set in the config will appear in Home Assistant. Those without will be only local to the device and just have an id. This is how you can link multiple components together on the device, then present a single device to Home Assistant (like garage remote below).
Software reset switch
First thing we can do is add a software switch which will let us reboot the device from Home Assistant (or by publishing manually to MQTT or API). To do this, we add the reboot platform from the switch component. It’s as simple as adding this to the bottom of your YAML file.
switch:
  - platform: restart
    name: "Example Device Restart"
That’s it! Now we can re-run the compile and flash. This time you can use OTA to flash the device via mDNS (but if it’s still connected via TTY then you can still use that instead).
esphome example.yaml run
This is what OTA updates look like.
INFO Successfully compiled program.
Found multiple options, please choose one:
  [1] /dev/ttyUSB0 (CP2104 USB to UART Bridge Controller)
  [2] Over The Air (example.local)
(number): 2
INFO Resolving IP address of example.local
INFO  -> 10.0.0.123
INFO Uploading ./builds/example/.pioenvs/example/firmware.bin (856368 bytes)
Uploading: [=====================================                       ] 62%
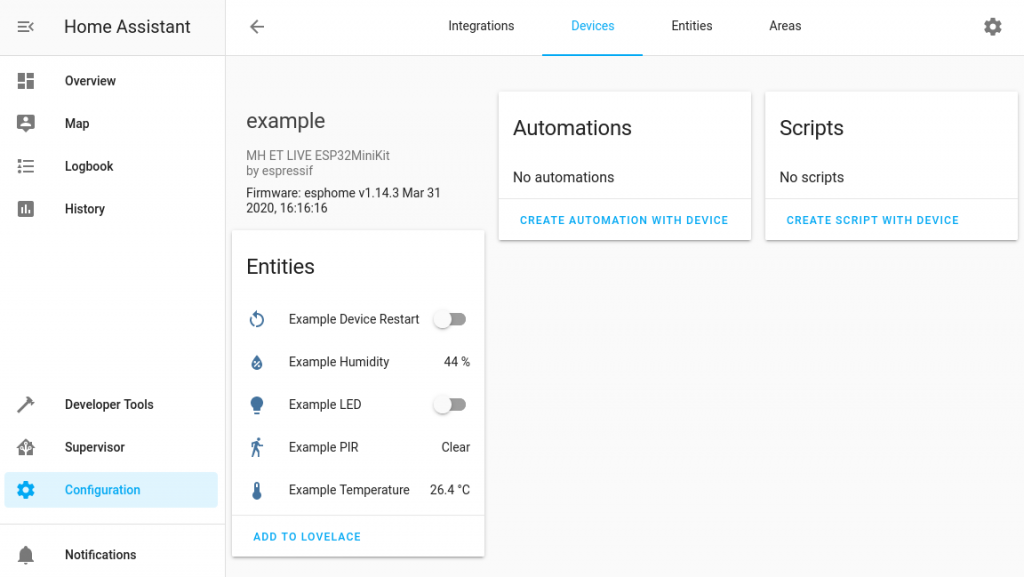
After the device reboots, the new reset button should automatically show up in Home Assistant as a device, under Configuration -> Devices under the name example.
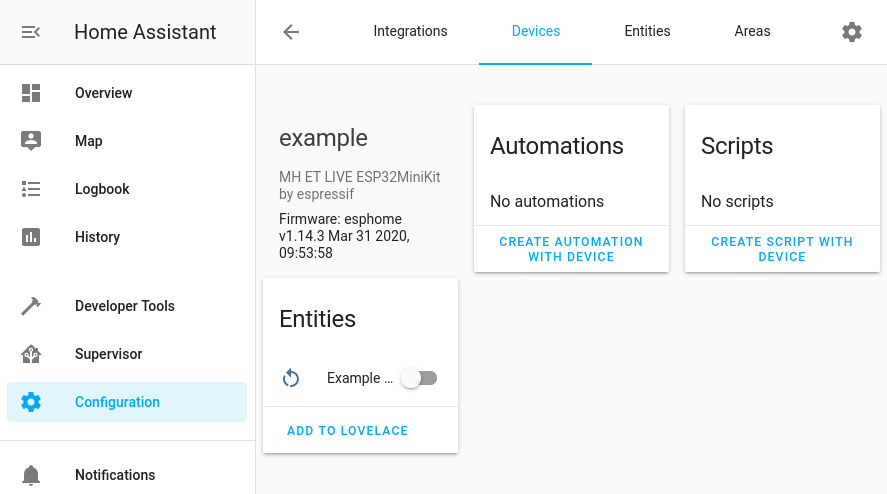
Because we set a name for the reset switch, the reboot switch is visible and called Example Device Restart. If you want to make this visible on the main Overview dashboard, you can do so by selecting ADD TO LOVELACE.

Go ahead and toggle the switch while still tailing the log of the device and you should see it restart. If you’ve already disconnected your ESP device from your computer, you can tail the log using MQTT.
LED light switch
OK, so rebooting the device is cute. Now what if we want to add something more useful for home automation? Well that requires some soldering or breadboard action, but what we can do easily is use the built-in LED on the device as a light and control it through Home Assistant.
On the ESP32 module, the built-in LED is connected to GPIO pin 2. We will first define that pin as an output component using the ESP32 LEDC platform (supports PWM). We then attach a light component using the monochromatic platform to that output component. Let’s add those two things to our config!
output:
  # Built-in LED on the ESP32
  - platform: ledc
    pin: 2
    id: output_ledpin2

light:
  # Light created from built-in LED output
  - platform: monochromatic
    name: "Example LED"
    output: output_ledpin2
Build and flash the new firmware again.
esphome example.yaml run
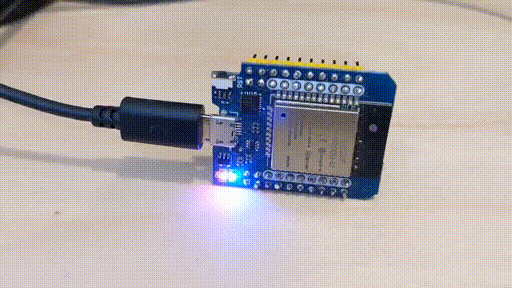
After the device reboots, you should now be able to see the new Example LED automatically in Home Assistant.

If we toggle this light a few times, we can see the built-in LED on the ESP device fading in and out at the same time.
Other components
As mentioned previously, there are many devices we can easily add to a single board like relays, PIR sensors, temperature and humidity sensors, reed switches and more.

All we need to do is connect them up to appropriate GPIO pins and define them in the YAML.
PIR sensor
A PIR sensor connects to ground and 3-5V, with data connecting to a GPIO pin (let’s use 34 in the example). We read the GPIO pin and can tell when motion is detected because the control pin voltage is set to high. Under ESPHome we can use the binary_sensor component with gpio platform. If needed, pulling the pin down is easy, just set the default mode. Finally, we set the class of the device to motion which will set the appropriate icon in Home Assistant. It’s as simple as adding this to the bottom of your YAML file.
binary_sensor:
  - platform: gpio
    pin:
      number: 34
      mode: INPUT_PULLDOWN
    name: "Example PIR"
    device_class: motion
Again, compile and flash the firmware with esphome.
esphome example.yaml run
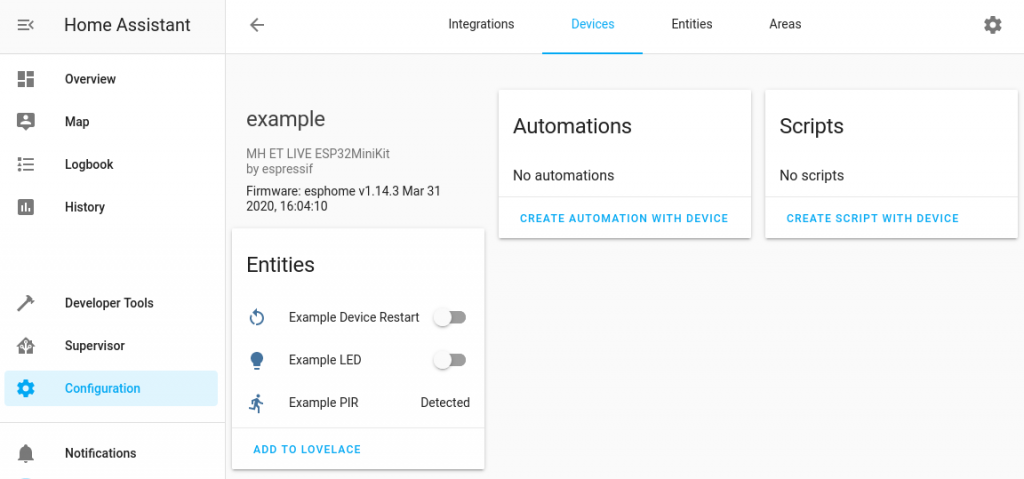
As before, after the device reboots again we should see the new PIR device appear in Home Assistant.
Temperature and humidity sensor
Let’s do another example, a DHT22 temperature sensor connected to GPIO pin 16. Simply add this to the bottom of your YAML file.
sensor:
  - platform: dht
    pin: 16
    model: DHT22
    temperature:
      name: "Example Temperature"
    humidity:
      name: "Example Humidity"
    update_interval: 10s
Compile and flash.
esphome example.yaml run
After it reboots, you should see the new temperature and humidity inputs under devices in Home Assistant. Magic!
Garage opener using templates and logic on the device
Hopefully you can see just how easy it is to add things to your ESP device and have them show up in Home Assistant. Sometimes though, you need to make things a little more tricky. Take opening a garage door for example, which only has one button to start and stop the motor in turn. To emulate pressing the garage opener, you need apply voltage to the opener’s push button input for a short while and then turn it off again. We can do all of this easily on the device with ESPHome and preset a single button to Home Assistant.
Let’s assume we have a relay connected up to a garage door opener’s push button (PB) input. The relay control pin is connected to our ESP32 on GPIO pin 22.
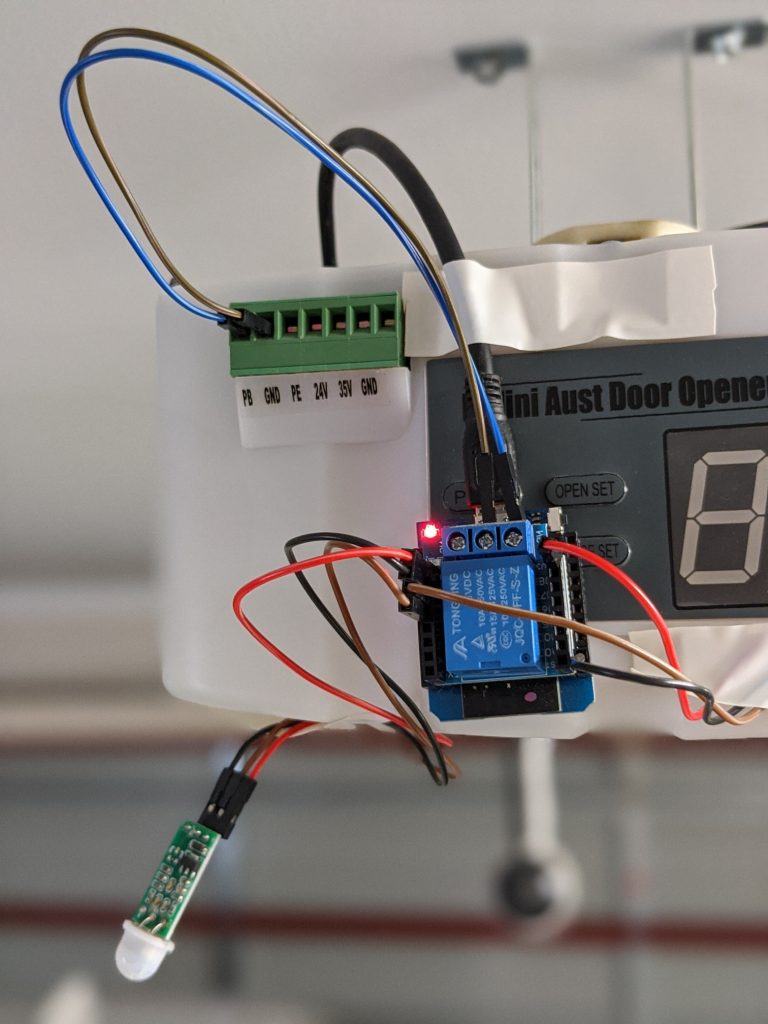
We need to add a couple of devices to the ESP module and then expose only the button out to Home Assistant. Note that the relay only has an id, so it is local only and not presented to Home Assistant. However, the template switch which uses the relay has a name is and it has an action which causes the relay to be turned on and off, emulating a button press.
Remember we already added a switch component for the reboot platform? Now need to add the new platform devices to that same section (don’t create a second switch entry).
switch:
  - platform: restart
    name: "Example Device Restart"

  # The relay control pin (local only)
  - platform: gpio
    pin: GPIO22
    id: switch_relay

  # The button to emulate a button press, uses the relay
  - platform: template
    name: "Example Garage Door Remote"
    icon: "mdi:garage"
    turn_on_action:
    - switch.turn_on: switch_relay
    - delay: 500ms
    - switch.turn_off: switch_relay
Compile and flash again.
esphome example.yaml run
After the device reboots, we should now see the new Garage Door Remote in the UI.
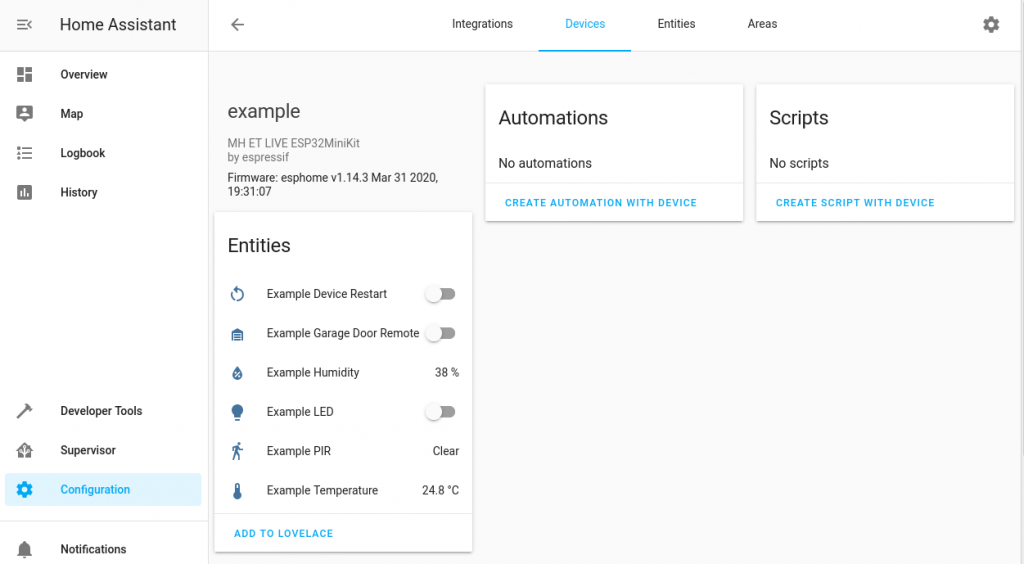
If you actually cabled this up and toggled the button in Home Assistant, the UI button turn on and you would hear the relay click on, then off, then the UI button would go back to the off state. Pretty neat!
There are many other things you can do with ESPHome, but this is just a taste.
Commit your config to Git
Once you have a device to your liking, commit it to Git. This way you can track the changes you’ve made and can always go back to a working config.
git add example.yaml
git commit -m "adding my first example config"
Of course it’s probably a good idea to push your Git repo somewhere remote, perhaps even share your configs with others!
Creating automation in Home Assistant
Of course once you have all these devices it’s great to be able to use them in Home Assistant, but ultimately the point of it all is to automate the home. Thus, you can use Home Assistant to set up scripts and react to things that happen. That’s beyond the scope of this particular post though, as I really wanted to introduce ESPHome and show how you can easily manage devices and integrate them with Home Assistant. There is pretty good documentation online though. Enjoy!
Overriding PlatformIO
As a final note, if you need to override something from PlatformIO, for example specifying a specific version of a dependency, you can do that by creating a modified platformio.ini file in your configs dir (copy from one of your build dirs and modify as needed). This way esphome will pick it up and apply that or you automatically.

15 thoughts on “Defining home automation devices in YAML with ESPHome and Home Assistant, no programming required!”
Wow – I had no idea we had this easy a framework for HomeAssistant to make ESP32 devices work easier. Thank you so much for sharing!
Yeah, it really is great!
Thanks for sharing this, Chris – well laid out and clear to follow.
Now I just need some time to try it out for myself.
Are you at all interested in replacing you Google bug^H^H^H Home?
I have been researching various open-source speech-to-text projects and want to try some out, as in all speech processing taking place in-house.
Hey Bob, yes, I definitely do want to replace it at some point and I’ve also been looking at a few different platforms. I got it mostly to see what it was like and what’s possible in the world of home automation. It’s been a good eye opener for that.
Yep. Tried ESPHome to control sprinklers. Found that any breakdown in wifi between ha server and ESPHome widget left confusion between ha and widget state if/when comms was re-established. Certainly, if ha had turned sprinklers on, expect an exorbitant water bill. ESPHome not recommended for critical apps. I ended up with a hand coded esp8266 app on mqtt that has multiple fail-safes. Including dealing safely with comms breakdowns.
Thanks for posting your experiences, I’d love to know more. When you were using ESPHome, did you have all of your logic in Home Assistant? Is that what caused the issues? If the logic is still in HA, how did you solve this with custom code? Sounds like you made the connections more robust and put more logic in the device so that it didn’t do things unless there was a connection? Was that the fundamental change, or did I miss something? I’m keen to learn more! Cheers.
Hi, very interesting!.
Any question, i need control the 5 fans for my Rack home lab, is possible with ESPHOME??
What Hard need?
My idea is put a thermometer , when pass the x temps up or down the power off fans
Yes, you could do that, either with a single ESP and supporting boards where you put all the logic into it, or using something like home assistant. You would need a way to control the fans, probably via pulse-width modulation, and connect the controller to something like home assistant. Then you have a temp sensor which also reports to home assistant. You make a rule in home assistant that increases and decreases the fan speeds when the temp reaches certain limits.
In general it’s not advised to store any form of credentials on external services such as github. Even if you’re using a private repository, there’s still potential for leaking them or getting them stolen.
It’s much safer to start your IoT device with no wifi secret and start it as AP and register it on your wifi once.
These are just local Git repositories so it doesn’t mean they are pushed to GitHub, nevertheless I’ve added a note saying that the Git repo which holds the secrets is, “private and local, it is not pushed to GitHub.” Thanks!
Nice one Chris, cool post. I moved a bunch of stuff I had running in podman containers over to k8s deployments instead – bitwarden, hass, unifi, awx, etc. For hass, it’s nothing too complex, just a deployment, replicaset and service in a namespace with an ingress. It does hinder the auto discovery capability, but it increases the “hip” factor.
Thanks for sharing, you’ve given me lots of ideas to try at my place.
Hey Brendan! Cool, no worries 🙂 Let me know if what you end up working on and if you need a hand.
Cool tutorial! Do you know how you would go about tying the fate/state of two switches together? Basically I have a relay which is controlling a fan. I also have an LED which shows the state of the fan. I’d like to link the LED and the fan together so that the LED ALWAYS correctly shows the state of the fan. I know I can do this in automations on either the HA side or the ESPHome side – but what’s the most foolproof/efficient way to do it? Thanks!
Should be able to, so you want the LED to reflect the state of the relay? The relay is fired by pulling a GPIO pin high or low I assume? So you want to make sure those two states match? Is the relay driven by a button which is also a GPIO pin?
Great article. I’ve been playing with Esphome for a few days now. It’s great! I’ve had no problem adding devices to my Home Assistant using the API method. I’m having a much more difficult time trying to do a standalone MQTT setup without HA. From my readings I see you’re supposed to delete the API settings when you’re not connecting to HA. In your example you’re setting both the HA connections as well as the MQTT config. I didn’t know you could do both. I’m guessing as long as there is HA to connect to the mqtt settings don’t cause a problem. In my case I want to ditch the HA so I’m only including the mqtt settings. On an mqtt only set up I’m not sure where to state the topic and force my device to send data. In my case it’s an HX711 load scale chip. Have you got any info on an mqtt only setup configs it?
Thanks