My home automation setup will make use of Arduinos and also embedded Linux devices. I’m currently looking into a few boards to see if any meet my criteria. Previously I looked at the Orange Pi One, now I’m looking at the Raspberry Pi 2 (which is compatible with the 3).
The most important factor for me is that the device must be supported in upstream Linux (preferably stable, but mainline will do) and U-Boot. I do not wish to use any old, crappy, vulnerable vendor trees!
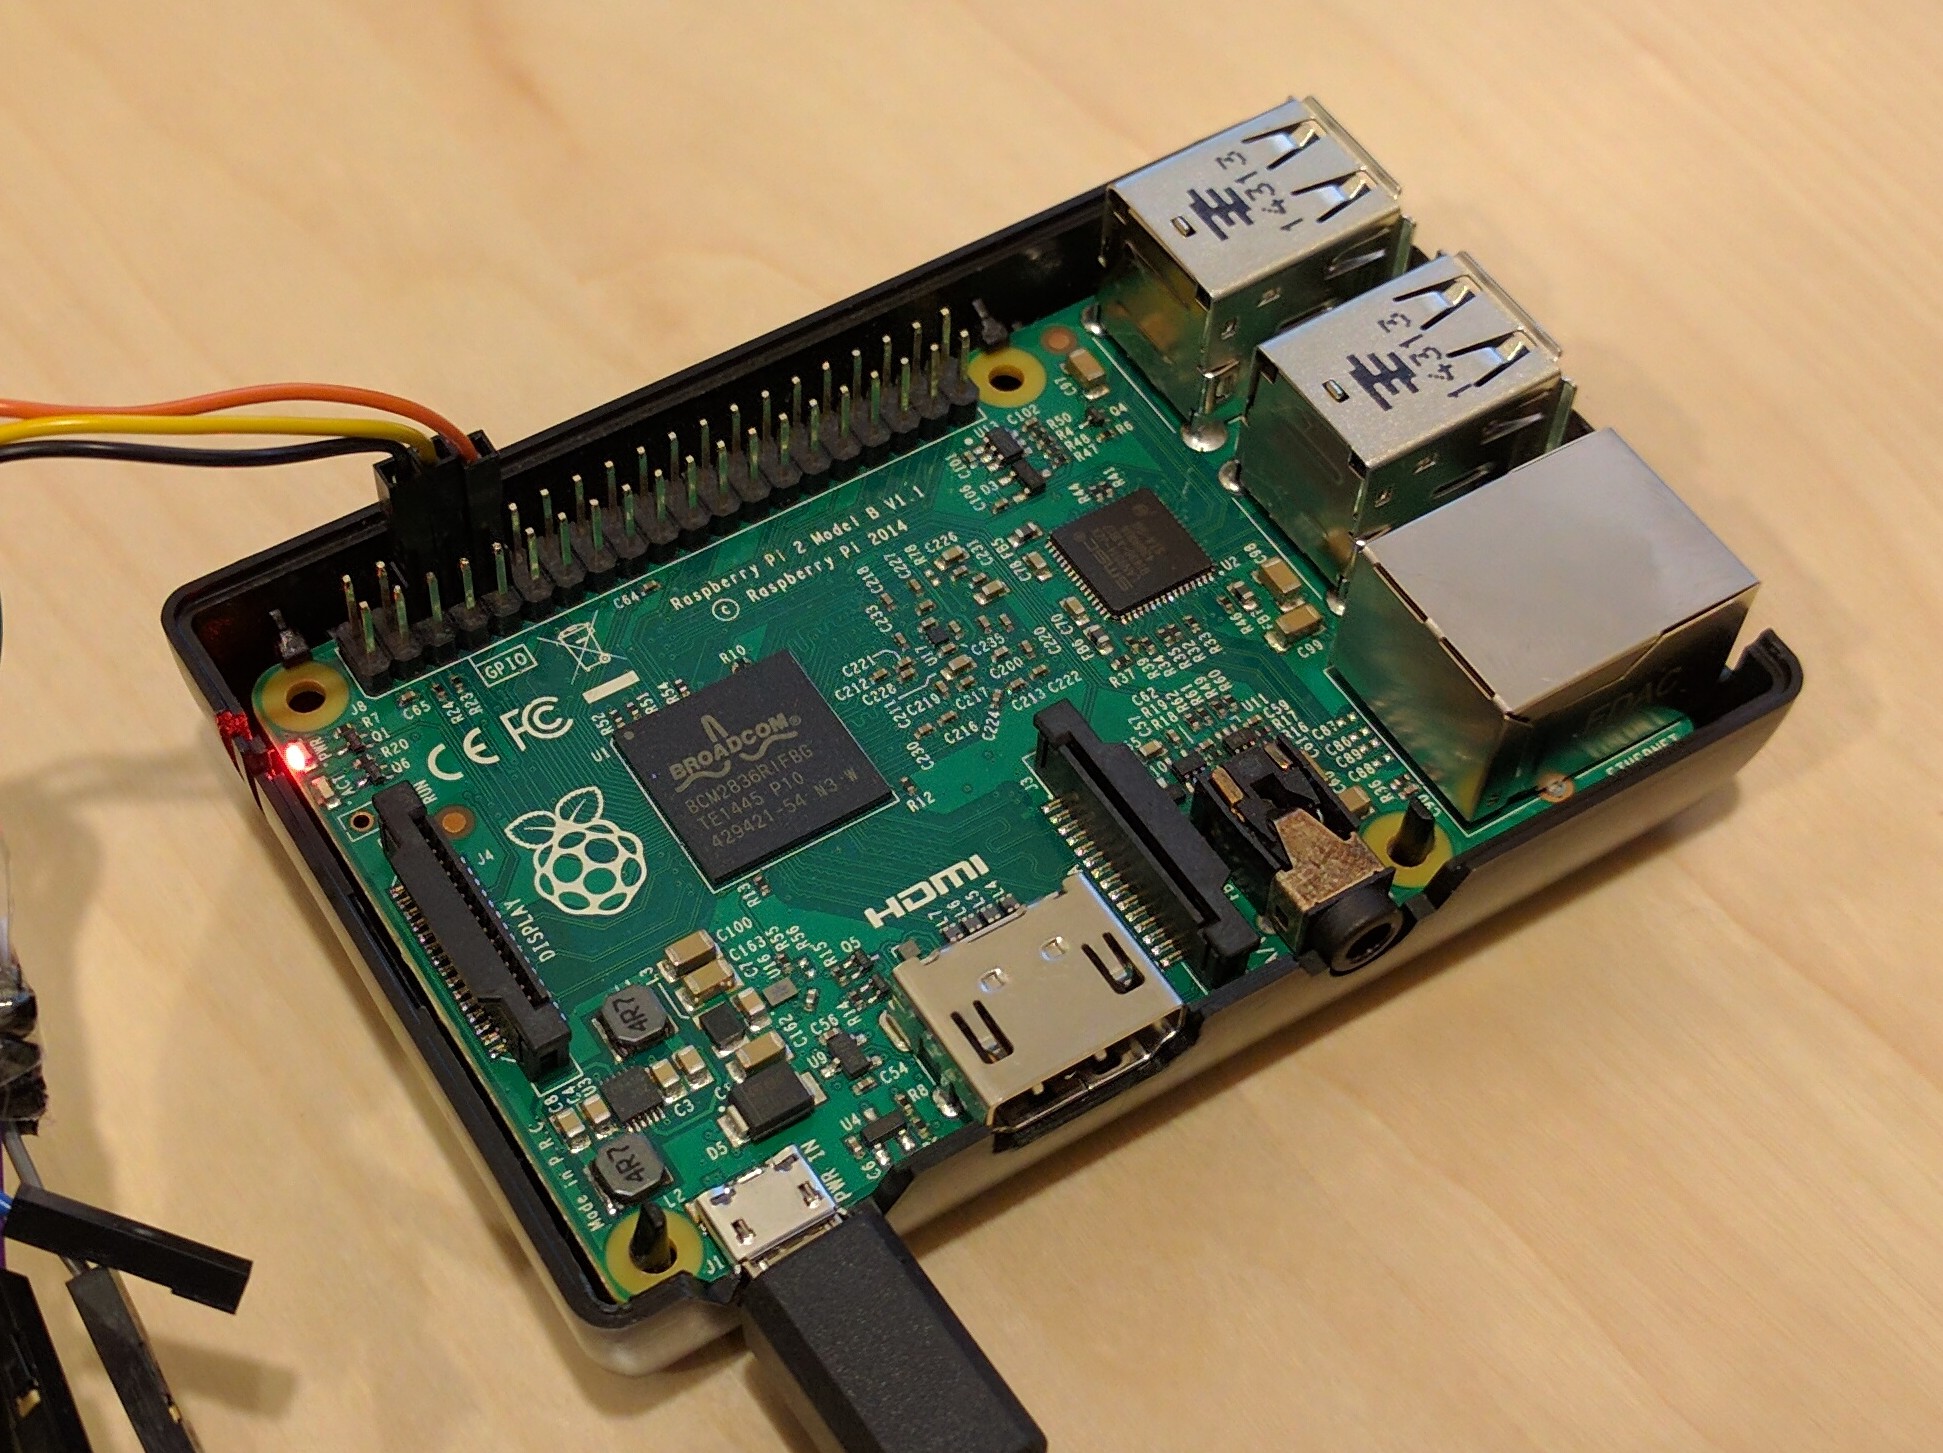
The Raspberry Pi needs little introduction. It’s a small ARM device, created for education, that’s taken the world by storm and is used in lots of projects.
The Raspberry Pi actually has native support for booting a kernel, you don’t have to use U-Boot. However, one of the neat things about U-Boot is that it can provide netboot capabilities, so that you can boot your device from images across the network (we’re just going to use it to boot a kernel and initramfs, however).
One of the other interesting things about the Raspberry Pi is that there are lots of ways to tweak the device using a config.txt file.
The Raspberry Pi 3 has a 64bit CPU, however it is probably best run in 32bit mode (as a Raspberry Pi 2) as 64bit userland is not particularly advanced in ARM world, yet.
Fedora 25 will finally support Raspberry Pi 2 and 3 (although not all peripherals will be supported right away).
Connecting UART
The UART on the Raspberry Pi uses the GND, TX and RX connections which are on the GPIO pins (see above). Plug the corresponding cables from a 3.3V UART cable onto these pins and then into a USB port on your machine.
Your device will probably be /dev/ttyUSB0, but you can check this with dmesg just after plugging it in.
Now we can simply use screen to connect to the UART, but you’ll have to be in the dialout group.
sudo gpasswd -a ${USER} dialout

newgrp dialout

screen /dev/ttyUSB0 115200
Note that you won’t see anything just yet without an SD card that has a working bootloader. We’ll get to that shortly!
Partition the SD card
First things first, get yourself an SD card.
The card needs to have an msdos partition table with a smallish boot partition (formatted FAT32). The binary U-Boot file will sit there, called kernel.img, along with some other bootloader files. You can use the rest of the card for the root file system (but we’ll boot an initramfs, so it’s not needed).
Assuming your card is at /dev/sdx (replace as necessary, check dmesg after plugging it in if you’re not sure).
sudo umount /dev/sdx* # makes sure it's not mounted

sudo parted -s /dev/sdx \

mklabel msdos \

mkpart primary fat32 1M 30M \

mkpart primary ext4 30M 100%
Now we can format the partitions (upstream U-Boot supports ext3 on the boot partition).
sudo mkfs.vfat /dev/sdx1

sudo mkfs.ext4 /dev/sdx2
Next, mount the boot partition to /mnt, this is where we will copy everything to.
sudo mount /dev/sdx1 /mnt
Leave your SD card plugged in, we will need to copy the bootloader to it soon!
Upstream U-Boot Bootloader
Install the arm build toolchain dependencies.
sudo dnf install \

gcc-arm-linux-gnu \

binutils-arm-linux-gnu \

uboot-tools
We need to clone upstream U-Boot Git tree. Note that I’m checking out the release directly (-b v2016.09.01) but you could leave this off to get master, or change it to a different tag if you want.
cd "${HOME}"

git clone --depth 1 -b v2016.09.01 git://git.denx.de/u-boot.git

cd u-boot
There are default configs for both Raspberry Pi 2 and 3, so select the one you want.
# Run this for the Pi 2

CROSS_COMPILE=arm-linux-gnu- make rpi_2_defconfig

# Run this for the Pi 3

CROSS_COMPILE=arm-linux-gnu- make rpi_3_32b_defconfig
Now, compile it.
CROSS_COMPILE=arm-linux-gnu- make -j$(nproc)
Now, copy the u-boot.bin file onto the SD card, and call it kernel.img (this is what the bootloader looks for).
sudo cp -iv u-boot.bin /mnt/kernel.img
Proprietary bootloader files
Sadly, the Raspberry Pi cannot boot entirely on open source software, we need to get the proprietary files from Broadcom and place them on the SD card also.
Clone the Raspberry Pi Foundation’s GitHub repository.
cd "${HOME}"

git clone --depth 1 https://github.com/raspberrypi/firmware
Copy the minimum set of required files to the SD card.
sudo cp -iv firmware/boot/{bootcode.bin,fixup.dat,start.elf} /mnt/
Finally, unmount the SD card.
sync && sudo umount /mnt
OK, now our bootloader should be ready to go.
Testing our bootloader
Now we can remove the SD card from the computer and plug it into the powered off Raspberry Pi to see if our bootloader build was successful.
Switch back to your terminal that’s running screen and then power up the Pi. Note that the device will try to netboot by default, so you’ll need to hit the enter key when you see a line that says the following.
![]()
(Or you can just repeatedly hit enter key in the screen console while you turn the device on.)
Note that if you don’t see anything, swap the RX and TX pins on the UART and try again.
With any luck you will then get to a U-Boot prompt where we can check the build by running the version command. It should have the U-Boot version we checked out from Git and today’s build date!
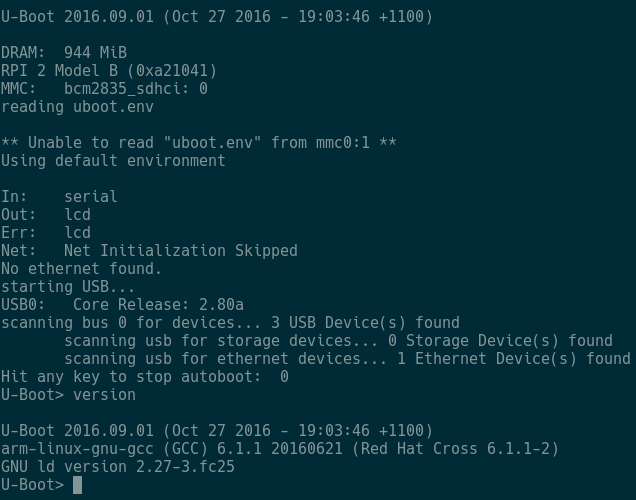
Hurrah! If that didn’t work for you, repeat the build and writing steps above. You must have a working bootloader before you can get a kernel to work.
If that worked, power off your device and re-insert the SD card into your computer and mount it at /mnt.
sudo umount /dev/sdx* # unmount everywhere first

sudo mount /dev/sdx1 /mnt
Creating an initramfs
Of course, a kernel won’t be much good without some userspace. Let’s use Fedora’s static busybox package to build a simple initramfs that we can boot on the Raspberry Pi.
I have a script that makes this easy, you can grab it from GitHub.
Ensure your SD card is plugged into your computer and mounted at /mnt, then we can copy the file on!
cd ${HOME}

git clone https://github.com/csmart/custom-initramfs.git

cd custom-initramfs

./create_initramfs.sh --arch arm --dir "${PWD}" --tty ttyAMA0
This will create an initramfs for us in your custom-initramfs directory, called initramfs-arm.cpio.gz. We’re not done yet, though, we need to convert this to the format supported by U-Boot (we’ll write it directly to the SD card).
gunzip initramfs-arm.cpio.gz

sudo mkimage -A arm -T ramdisk -C none -n uInitrd \

-d initramfs-arm.cpio /mnt/uInitrd
Now we have a simple initramfs ready to go.
Upstream Linux Kernel
Clone the mainline Linux tree (this will take a while). Note that I’m getting the latest tagged release by default (-b v4.9-rc1) but you could leave this off or change it to some other tag if you want.
cd ${HOME}

git clone --depth 1 -b v4.9-rc1 \

git://git.kernel.org/pub/scm/linux/kernel/git/torvalds/linux.git
Or, if you want to try linux-stable, clone this repo instead.
git clone --depth 1 -b v4.8.4 \

git://git.kernel.org/pub/scm/linux/kernel/git/stable/linux-stable.git linux
Now go into the linux directory.
cd linux
Building the kernel
Now we are ready to build our kernel!
Load the default kernel config for the sunxi boards.
ARCH=arm CROSS_COMPILE=arm-linux-gnu- make bcm2835_defconfig
If you want, you could modify the kernel config here, but it’s not necessary.
ARCH=arm CROSS_COMPILE=arm-linux-gnu- make menuconfig
Build the kernel image and device tree blob.
ARCH=arm CROSS_COMPILE=arm-linux-gnu- make -j$(nproc) zImage dtbs
Mount the boot partition and copy on the kernel and device tree file.
sudo cp -iv arch/arm/boot/zImage /mnt/

sudo cp -iv arch/arm/boot/dts/bcm2836-rpi-2-b.dtb /mnt/
Bootloader config
Next we need to make a bootloader file, boot.cmd, which tells U-Boot what to load and boot (the kernel, device tree and initramfs).
The bootargs line says to output the console to serial and to boot from the ramdisk. Variables are used for the memory locations of the kernel, dtb and initramfs.
Note that the root device is /dev/root which is required for the initramfs.
cat > boot.cmd << EOF

fatload mmc 0 \${kernel_addr_r} zImage

fatload mmc 0 \${fdt_addr_r} bcm2836-rpi-2-b.dtb

fatload mmc 0 \${ramdisk_addr_r} uInitrd

setenv bootargs console=ttyAMA0,115200 earlyprintk root=/dev/root \

rootwait panic=10

bootz \${kernel_addr_r} \${ramdisk_addr_r} \${fdt_addr_r}

EOF
Compile the bootloader file and output it directly to the SD card at /mnt.
sudo mkimage -C none -A arm -T script -d boot.cmd /mnt/boot.scr
Now, unmount your SD card.
sudo umount /dev/sdx*
Testing it all
Insert it into the Raspberry Pi and turn it on! Hopefully you’ll see it booting the kernel on your screen terminal window.
You should be greeted by a login prompt. Log in with root (no password).
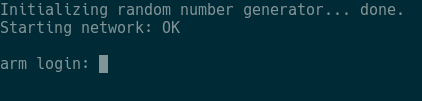
That’s it! You’ve built your own Linux system for the Raspberry Pi!
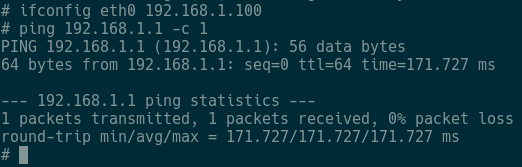
Networking
Log in as root and give the Ethernet device (eth0) an IP address on your network.
Now test it with a tool, like ping, and see if your network is working.
Here’s an example:
Memory usage
There is clearly lots more you can do with this device…

Enjoy!

42 thoughts on “Building and Booting Upstream Linux and U-Boot for Raspberry Pi 2/3 ARM Boards”
I followed the steps on raspberry pi 3. It booted uboot and tried to book kernel zImage..but hanged at Starting kernel….
Can you provide some of your configurations?
Hi Chris,
Sorry for the late response. It is booting now. I have a serial console connected. “uname -a” output:
Linux buildroot 4.9.4 #1 SMP Tue Jan 17 20:55:03 PST 2017 armv7l GNU/Linux
Only problem is when I build a latest stable upstream kernel, I do not see more than 1 core, even though SMP is shown in the output of “uname -a”. I chose SMP in kernel features options in menuconfig.
# cat /proc/cpuinfo
processor : 0
model name : ARMv7 Processor rev 4 (v7l)
BogoMIPS : 38.40
Features : half thumb fastmult vfp edsp vfpv3 tls vfpv4 idiva idivt vfpd32 lpae evtstrm crc32
CPU implementer : 0x41
CPU architecture: 7
CPU variant : 0x0
CPU part : 0xd03
CPU revision : 4
Hardware : BCM2835
Revision : 0000
Serial : 00000000bf829e3f
# uname -a
Linux buildroot 4.9.4 #1 SMP Tue Jan 17 20:55:03 PST 2017 armv7l GNU/Linux
Hi,
I find that you are creating a ram file system and booting from ram file system itself. How to boot using a root file system?. How do I compile a root file system and boot from it in raspberry pi?
If you want to boot from a ramfs, then you can copy the contents of the cpio to the partition and then you need to modify your uboot config to tell it to boot from the partition (e.g. mmcblk1p2) and the bootz line. Something like:
cat > boot.cmd << EOF fatload mmc 0 \${kernel_addr_r} zImage fatload mmc 0 \${fdt_addr_r} bcm2836-rpi-2-b.dtb setenv bootargs console=ttyAMA0,115200 earlyprintk root=/dev/mmcblk1p2 \ rootwait panic=10 bootz \${kernel_addr_r} - \${fdt_addr_r} EOFHi,
I tried to create a initramfs as per your custom-initramfs script.
The file is created and I follow to unzip it and make a u-boot compatible image.
However, the u-boot tries to load it but it says :
Wrong Ramdisk Image format!
I tried with -C gzip, and couple of other option like creating the .gx cpio, with compress, without compress and none of them are in correct format.
What is the proper format for initramfs for RPi2/3?
I am using y custom kernel 4.4.50 with initramfs enabled.
Also all formats like gz, bz2 and others also enabled.
U-boot loads fine and if I do not use initramfs in boot script I also can boot to my rootfs but with initramfs enabled in boot script it always drop to u-boot prompe and say that the Ramdisk Image is Wrong Format!
Any advise?
Hi,
I tried to compile and use 4.9-rc8 kernel and all was working!
However, my u-boot compile (v2017) also was fine.
My question is that, as 4.9 does not have compatible module and is not supported by RPi yet, I have to use to kernel, one with initramfs(zImage) and another for rootfs itself(kernel7.img).
As this feature is part of the core Kernel, is there any patch to be able to use the 4.4.50 kernel forinstance for both initramfs and rootfs?!
I am also very Ubuntu oriented. Is there any tools or script like what you have for Fedora based one to generate the initramfs based on Ubuntu?
Many thanks….
Hi,
what is kernel_addr_r and fdt_addr_r?
what values I should I use for those two, I am using raspberrypi 2 model b board.
Can anybody help me.
Thanks
Thanks Chris,
I built a linux successfully for rpi with the above mentioned steps. but I couldnt get the uboot messages on the serial terminal. Is there any aditional configuration for uboot to made be and built?
You just use those, they are variables that should automatically be expanded in uboot.
I think it should be a gzip compressed cpio. So it’s not unzip, it should be gunzip?
The script to create the initramfs should also work on Ubuntu. Did you try it? What errors did you have?
Hi,
thanks a lot for this tutorial. I followed all the steps for the u-boot but when testing it in my Pi3 i see nothing on the console. I did it already twice. What can be the problem?
Some Info:
**********
->Instead of rpi_3_32b_defconfig, I used rpi_3_defconfig
->Also i used CROSS_COMPILE=gcc-linaro-6.3.1-2017.02-x86_64_aarch64- elf/bin/aarch-elf-
->I am using debian jessie system.
Thanks
Are you using the UART, or HDMI to see the console?
-c
Just a guess, but perhaps the binary firmware doesn’t know how to execute a 64bit kernel.img? Can you try to get it working with the 32bit version as per the post and make sure everything else is working, e.g. the firmware, u-boot and output on serial. Then try the 64bit one.
Hi,
thanks
I figured the solution to the problem.
For 64-bit U-boot, one has to creat a config.txt file with the following in the fat partition:
arm_control=0x200
enable_uart=1
Then it works.
source:https://kernelnomicon.org/?p=682
Hi Chris,
create_initramfs.sh not working on ubuntu.
I have mentioned the logs below.
$> ./create_initramfs.sh –arch arm –dir “${PWD}” –tty ttyAMA0
Downloading busybox…
Failed to download the busybox RPM
$> vim create_initramfs.sh
$> bus
busctl busybox
$> bus
busctl busybox
$> busybox
BusyBox v1.22.1 (Ubuntu 1:1.22.0-15ubuntu1) multi-call binary.
BusyBox is copyrighted by many authors between 1998-2012.
Licensed under GPLv2. See source distribution for detailed
copyright notices.
$> uname -a
Linux yogender-HP-G42-Notebook-PC 4.4.0-83-generic #106-Ubuntu SMP Mon Jun 26 17:54:25 UTC 2017 i686 i686 i686 GNU/Linux
Hi Chris,
Thanks for the nice tutorial! Could you explain why you choose the ‘sunxi board’ for the kernel config? Or how do you know to chose this one 🙂
Thanks again,
Benedikt
Hello!
I’ve followed the instructions to compile the boot loader. This works, but if running the bootz command, u-boot complains that this command is unknown.
Any ideas?
Regards
Thomas
Thanks, excellent description – works like a charm. In my case I was just building the ‘boats’ and had pre-built kernels an user-space images ready via tftp.
Sorry I haven’t used that command…
I think just from research around the internet and git logs in the linux kernel looking for mention of the models and looking at the patches. The allwinner chipsets are supported under the sunxi community effort http://linux-sunxi.org/
OK thanks, I probably need to update the script.
Hey Chris, have you realized that this kernel is initializing only 1 core? if you do a “cat /proc/cpuinfo” you will see that only cpu 0 is active.
Looking into .config, I see that CONFIG_SMP is not set so I did a make menuconfig and added support for SMP (which sets CONFIG_SMP into .config.
Still it doesnt bring up the rest of cores.
I also have found another hint(looking at dmesg) that the other cores are not enabled:
DMESG –> RCU restricting CPUs from NR_CPUS=4 to nr_cpu_ids=1.
Looking in init/main.c I see that the kernel tries to guess the number of cpus (but fails miserably) I am trying to investigate why we are only using 1 core (from the quad core) but your help would be great too.
Cheers – Danny
I followed the steps as specified
when i execute the bootz command
i keep getting the msg
“mmc0 dev err -110 whilst initialzing SD card”
i am assuming nothing can be wrong with the sd card as
the other fatload command work
unless something about mmcblk0p2 that i have missed
i just partitioned it as ext4 as per document
anything else to be done there
How can i debug this please as at this point i am hosed
and cannot look at dmesg etc
added my snippet to above question
While booting kernel
I keep getting
6.058511] mmc0: error -110 whilst initialising SD card
bolded below as well
I have tried various things including 3 new Micro SD cards
still same error
I have also tried with and without initramfs same error
Here is my snippet below
081268] clocksource: Switched to clocksource arch_sys_counter
[ 0.120437] simple-framebuffer 3e669000.framebuffer: framebuffer at 0x3e669000, 0x57e400 bytes, mapped to 0xf1000000
[ 0.120461] simple-framebuffer 3e669000.framebuffer: format=a8r8g8b8, mode=1600x900x32, linelength=6400
[ 0.159895] Console: switching to colour frame buffer device 200×56
[ 0.198514] simple-framebuffer 3e669000.framebuffer: fb0: simplefb registered!
[ 0.208275] NET: Registered protocol family 2
[ 0.208972] TCP established hash table entries: 8192 (order: 3, 32768 bytes)
[ 0.209083] TCP bind hash table entries: 8192 (order: 3, 32768 bytes)
[ 0.209177] TCP: Hash tables configured (established 8192 bind 8192)
[ 0.209286] UDP hash table entries: 512 (order: 1, 8192 bytes)
[ 0.209321] UDP-Lite hash table entries: 512 (order: 1, 8192 bytes)
[ 0.209460] NET: Registered protocol family 1
[ 0.209778] RPC: Registered named UNIX socket transport module.
[ 0.209788] RPC: Registered udp transport module.
[ 0.209795] RPC: Registered tcp transport module.
[ 0.209803] RPC: Registered tcp NFSv4.1 backchannel transport module.
[ 0.210020] Unpacking initramfs…
[ 0.332737] Freeing initrd memory: 1328K (c2100000 – c224c000)
[ 0.333354] hw perfevents: enabled with armv7_cortex_a7 PMU driver, 7 counters available
[ 0.334897] workingset: timestamp_bits=30 max_order=18 bucket_order=0
[ 0.348216] Installing knfsd (copyright (C) 1996 okir@monad.swb.de).
[ 0.352240] Block layer SCSI generic (bsg) driver version 0.4 loaded (major 252)
[ 0.352253] io scheduler noop registered
[ 0.352263] io scheduler deadline registered
[ 0.352485] io scheduler cfq registered (default)
[ 0.356617] clk: couldn’t get clock 0 for /soc/pwm@7e20c000
[ 1.261960] bcm2835-rng 3f104000.rng: hwrng registered
[ 1.262155] [drm] Initialized
[ 1.263715] libphy: Fixed MDIO Bus: probed
[ 1.263868] usbcore: registered new interface driver zd1211rw
[ 1.263929] usbcore: registered new interface driver asix
[ 1.263983] usbcore: registered new interface driver ax88179_178a
[ 1.264040] usbcore: registered new interface driver cdc_ether
[ 1.264093] usbcore: registered new interface driver smsc95xx
[ 1.264145] usbcore: registered new interface driver net1080
[ 1.264198] usbcore: registered new interface driver cdc_subset
[ 1.264251] usbcore: registered new interface driver zaurus
[ 1.264313] usbcore: registered new interface driver cdc_ncm
[ 1.264627] usbcore: registered new interface driver usb-storage
[ 1.264950] mousedev: PS/2 mouse device common for all mice
[ 1.265093] i2c /dev entries driver
[ 1.265910] i2c-bcm2835 3f805000.i2c: Could not read clock-frequency property
[ 1.266604] bcm2835-wdt 3f100000.watchdog: Broadcom BCM2835 watchdog timer
[ 1.266863] sdhci: Secure Digital Host Controller Interface driver
[ 1.266871] sdhci: Copyright(c) Pierre Ossman
[ 1.266879] sdhci-pltfm: SDHCI platform and OF driver helper
[ 1.331287] mmc0: SDHCI controller on 3f300000.sdhci [3f300000.sdhci] using PIO
[ 1.331972] ledtrig-cpu: registered to indicate activity on CPUs
[ 1.335657] usbcore: registered new interface driver usbhid
[ 1.335666] usbhid: USB HID core driver
[ 1.335767] bcm2835-mbox 3f00b880.mailbox: mailbox enabled
[ 1.336744] oprofile: using timer interrupt.
[ 1.337818] NET: Registered protocol family 10
[ 1.338993] sit: IPv6, IPv4 and MPLS over IPv4 tunneling driver
[ 1.340076] NET: Registered protocol family 17
[ 1.347246] 3f201000.serial: ttyAMA0 at MMIO 0x3f201000 (irq = 87, base_baud = 0) is a PL011 rev2
[ 1.614586] mmc0: error -110 whilst initialising SD card
[ 1.965272] mmc0: error -110 whilst initialising SD card
[ 2.198860] console [ttyAMA0] enabled
[ 2.203807] raspberrypi-firmware soc:firmware: Attached to firmware from 2018-01-31 18:07
[ 2.212881] vc4-drm soc:gpu: bound 3f902000.hdmi (ops vc4_hdmi_ops)
[ 2.219165] vc4-drm soc:gpu: bound 3f400000.hvs (ops vc4_hvs_ops)
[ 2.225407] vc4-drm soc:gpu: bound 3f206000.pixelvalve (ops vc4_crtc_ops)
[ 2.232333] vc4-drm soc:gpu: bound 3f207000.pixelvalve (ops vc4_crtc_ops)
[ 2.239224] vc4-drm soc:gpu: bound 3f807000.pixelvalve (ops vc4_crtc_ops)
[ 2.246072] vc4-drm soc:gpu: bound 3fc00000.v3d (ops vc4_v3d_ops)
[ 2.252180] fb: switching to vc4drmfb from simple
[ 2.256988] Console: switching to colour dummy device 80×30
[ 2.263803] [drm] Supports vblank timestamp caching Rev 2 (21.10.2013).
[ 2.270415] [drm] Driver supports precise vblank timestamp query.
[ 2.276571] vc4-drm soc:gpu: No connectors reported connected with modes
[ 2.283281] [drm] Cannot find any crtc or sizes – going 1024×768
[ 2.312640] Console: switching to colour frame buffer device 128×48
[ 2.337327] vc4-drm soc:gpu: fb0: frame buffer device
[ 2.357755] mmc0: error -110 whilst initialising SD card
[ 2.392975] dwc2 3f980000.usb: DWC OTG Controller
[ 2.397699] dwc2 3f980000.usb: new USB bus registered, assigned bus number 1
[ 2.404785] dwc2 3f980000.usb: irq 39, io mem 0x00000000
[ 2.410940] hub 1-0:1.0: USB hub found
[ 2.414722] hub 1-0:1.0: 1 port detected
[ 2.419302] ALSA device list:
[ 2.422284] No soundcards found.
[ 2.425942] uart-pl011 3f201000.serial: no DMA platform data
[ 2.434140] Freeing unused kernel memory: 1024K (c0a00000 – c0b00000)
mounting /proc file system…
Booting Linux 4.3 for Assignment #3B
everything is fine
Please press Enter to activate this console. [ 2.635133] mmc0: error -110 whilst initialising SD card
[ 2.841287] usb 1-1: new high-speed USB device number 2 using dwc2
[ 3.082157] hub 1-1:1.0: USB hub found
[ 3.085960] hub 1-1:1.0: 5 ports detected
[ 3.310525] random: fast init done
[ 3.401291] usb 1-1.1: new high-speed USB device number 3 using dwc2
[ 3.534377] smsc95xx v1.0.5
[ 3.626806] smsc95xx 1-1.1:1.0 eth0: register ‘smsc95xx’ at usb-3f980000.usb-1.1, smsc95xx USB 2.0 Ethernet, b8:27:eb:a3:9a:90
[ 3.978522] mmc0: error -110 whilst initialising SD card
[ 4.194717] mmc0: error -110 whilst initialising SD card
[ 4.471171] mmc0: error -110 whilst initialising SD card
[ 4.621291] usb 1-1.2: new low-speed USB device number 4 using dwc2
[ 4.735129] mmc0: error -110 whilst initialising SD card
[ 4.761194] input: SIGMACHIP Usb Mouse as /devices/platform/soc/3f980000.usb/usb1/1-1/1-1.2/1-1.2:1.0/0003:1C4F:0003.0001/input/input0
[ 4.773624] hid-generic 0003:1C4F:0003.0001: input: USB HID v1.10 Mouse [SIGMACHIP Usb Mouse] on usb-3f980000.usb-1.2/input0
[ 4.902444] random: crng init done
[ 6.058511] mmc0: error -110 whilst initialising SD card
[ 6.274716] mmc0: error -110 whilst initialising SD card
[ 6.551165] mmc0: error -110 whilst initialising SD card
[ 6.815174] mmc0: error -110 whilst initialising SD card
[ 8.138497] mmc0: error -110 whilst initialising SD card
[ 8.354714] mmc0: error -110 whilst initialising SD card
[ 8.631168] mmc0: error -110 whilst initialising SD card
[ 8.895174] mmc0: error -110 whilst initialising SD card
[ 10.218475] mmc0: error -110 whilst initialising SD card
[ 10.434690] mmc0: error -110 whilst initialising SD card
[ 10.711159] mmc0: error -110 whilst initialising SD card
[ 10.975180] mmc0: error -110 whilst initialising SD card
[ 12.298501] mmc0: error -110 whilst initialisin
Hi Sved, I haven’t seen that… are you just booting using initramfs, or the root filesystem on the sd card?
Hey Danny, yeah good catch. I haven’t looked into that much more, but if I get a chance I’ll take a look.
Chris
Sorry for the delay
I first loaded the initramfs with
fatload mmc 0:1 ${ramdisk_addr_r}
fatload mmc 0:1 ${kernel_addr_r} zImage
fatload mmc 0:1 $fdt_addr_r} bcm2835-xxx.dtb
then set the bootargs
setenv bootargs console=ttyAMA0,115200
then the bootz
I tried also adding the root=/dev/mmcblkp2 rootwait etc
to the bootargs same result
Please note on my SD card ext4 partition i have nothing that is my question
will the initramfs be extracted there or do i need
a basic os on the 2nd partition of SD card
since you do not have it in your instructions i assumed i do not need anything on that partition
Thx Chris for any help.
Hi Chris,
The fstab url in custom initramfs script is showing 404 no found. Please check into that and provide an updated url.
Thanks
Fixed, thanks.
The kernel branch you suggest does not have the RPi 3 device trees, so I go to the latest stable (which does), build and install as per directions, but it always hangs at “Starting kernel”. Here are some of the commands I am using.
ARCH=arm CROSS_COMPILE=arm-linux-gnueabihf- make bcm2835_defconfi
ARCH=arm CROSS_COMPILE=arm-linux-gnueabihf- make -j$(nproc) zImage dtbs
sudo cp -iv arch/arm/boot/dts/bcm2837-rpi-3-b.dtb /mnt
cat > boot.cmd << EOF
fatload mmc 0 \${kernel_addr_r} zImage
fatload mmc 0 \${fdt_addr_r} bcm2837-rpi-3-b.dtb
fatload mmc 0 \${ramdisk_addr_r} uInitrd
setenv bootargs console=ttyAMA0,115200 earlyprintk root=/dev/root \
rootwait panic=10
bootz \${kernel_addr_r} \${ramdisk_addr_r} \${fdt_addr_r}
EOF
Any ideas for the Pi 3? Should I just pretend it's a 2?
Just to go a bit further – using the suggested kernel from 4.9 revision with the 2-b device tree gets me to the arm login, but I can’t type anything at that point. I can type at the u-boot prompt (interrupt it and run things), but the busybox prompt doesn’t respond to my keyboard.
Is that usb keyboard or over serial? Might be missing usb-hid drivers in the kernel? Or maybe some issue in device tree intialising USB devices? Do you see any kernel messages when you unplug and replug the device in?
Hello,
Great post !
It seems that for RPI3 B+ you need to specify kernel7.img when you copy the u-boot.bin.
Sebastian
Thanks!
Hi,
Any Instructions for making initramfs on ubuntu?
Sorry I missed your comment, I haven’t run Ubuntu it many years, so not sure, sorry 🙁
Does it work on Raspberry Pi 4B?
Not sure, I haven’t tried the 4…