Update: See Part 3.
In Part 1 I discussed motivation and research where I decided to build a custom, open source wired solution. In this Part 2 I discuss the design and the prototype that proved the design.
Wired Design
Although there are options like 1-Wire, I decided that I wanted more flexibility at the light switches.
- Inspired by Jon Oxer’s awesome SuperHouse.tv
- Individual circuits for lights and some General Purpose Outlets (GPO)
- Bank of relays control the circuits
- Arduinos and/or embedded Linux devices control the relays
How would it work?
- One Arduino or embedded Linux device per room
- Run C-Bus Cat5e cable to light switches to power Arduino, provide access to HA network
- Room Arduino takes buttons (lights, fans, etc) and sensors (temp, humidity, reed switch, PIR, etc) as inputs
- Room Arduino sends network message to relay Arduino
- Arduino with relay shield fires relay to enable/disable power to device (such as a light, fan, etc)
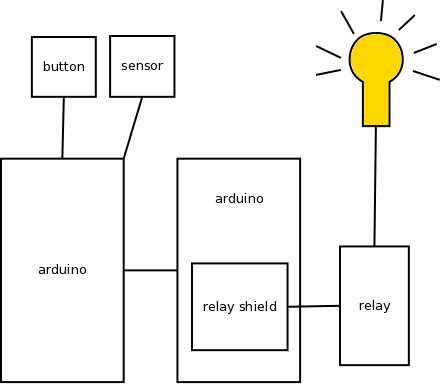
Of course this doesn’t just control lights, but also towel racks, fans, etc. Running C-Bus cable means that I can more easily switch to their proprietary system if I fail (or perhaps sell the house).
A relay is fine for devices such as LED downlights which don’t draw much current, but for larger devices (such as ovens and airconditioning) I will use the relay to throw a contactor.
Network Messaging
For the network messaging I chose MQTT (as many others have).
- Lightweight
- Supports encryption
- Uses publish/subscribe model with a broker
- Very easy to set up and well supported by Arduino and Linux
The way it works would be for the relay driver to subscribe to topics from devices around the house. Those devices publish messages to the topic, such as when buttons are pressed or sensors are triggered. The relay driver parses the messages and reacts accordingly (turning a device on or off).
Cabling Benefits
- More secure than wireless
- More future proof
- DC only, no need to touch AC
- Provides PoE for devices and motors
- Can still use wireless (e.g. ZigBee) if I want to
- Convert to proprietary system (C-Bus) if I fail
- My brother is a certified cabler 🙂
Prototype
- Got some Freeduinos and relay boards (from Freetronics)
- Hacked around with some ideas, was able to control the relays
- Basic concept seems doable
- More on that later..
However, I realised I wasn’t going to get this working in time. I needed a “dumb” mode that wouldn’t require any computers to turn on the lights at least.
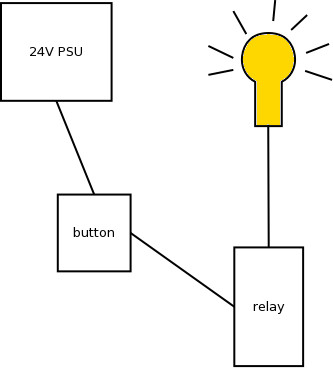
Dumb Mode Prototype
So, the dumb mode looks like this.
- Use the same Cat5e cabling so that Arduino devices can be installed later for smart mode
- Use standard off the shelf Clipsal light switches
- Support one, two, three and four way switching
- Run 24 volts over the Cat5e
- Light switch completes the circuit which feeds 24 volts into the relay
- Relay fires the circuit and light turns on!
We created a demo board that supported both dumb mode and smart mode, which proved that the concept worked well.

The board has:
- Six LEDs representing the lights
- Networking switch for the smart network
- One Arduino as the input (representing the light switch)
- One Arduino as the relay driver
- One Raspberry Pi (running Fedora) as the MQTT broker
- Several dumb mode multi-way light switches
- Smart inputs such has:
- Reed switch
- Temperature and humidity sensor
- Light sensor
- PIR
The dumb lights work without input from the smart network.
In smart mode, the Ardinos and Pi are on the same HA network and connect to the broker running on the Pi.
The input Arduino publishes MQTT messages from inputs such as sensors and buttons. The relay Arduino is subscribed to those topics and responds accordingly (e.g. controlling the relay when appropriate).
Dimming Lights
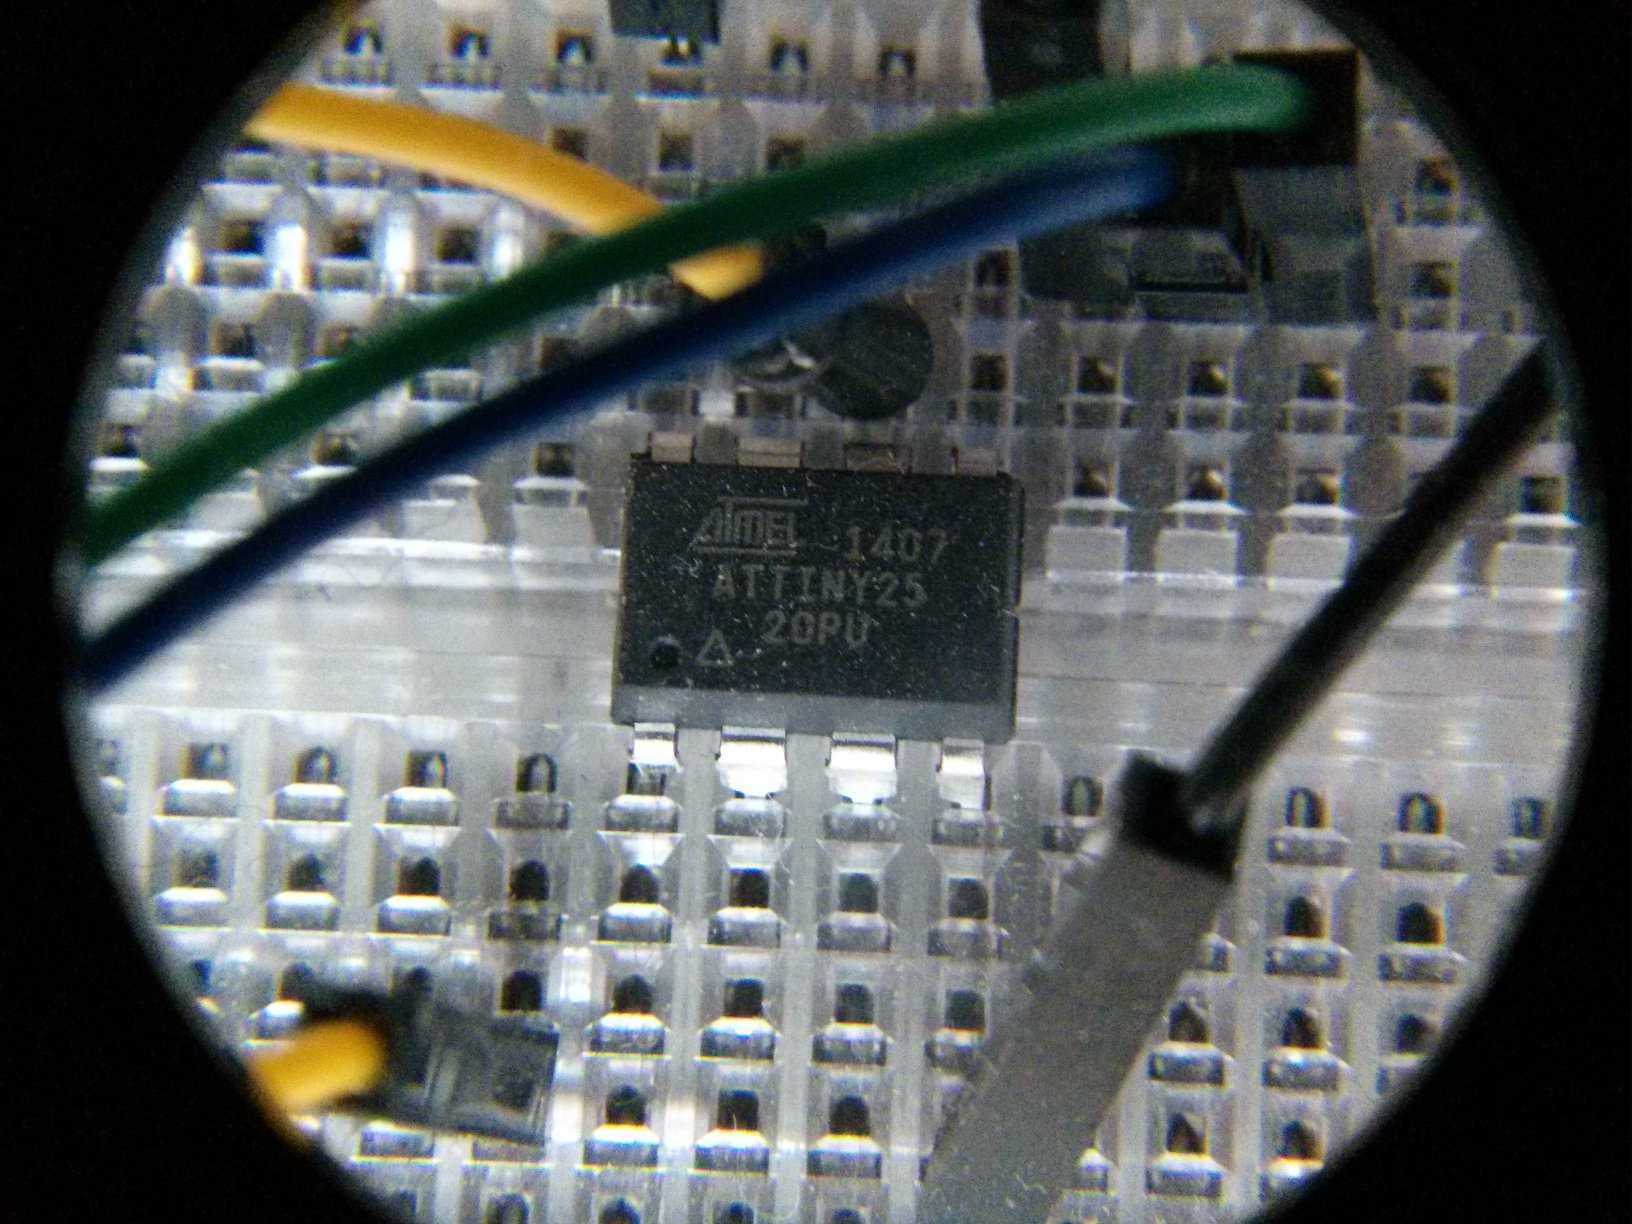
Also played with pulse width modulation (PWM) for LED downlights.
- Most LEDs come with smart dimmable drivers (power packs) that use leading or trailing edge on AC
- Wanted to control brightness via DC
- Used an arduino to program a small ATTiny for PWM
- Worked, but only with non-smart driver
- Got electrician to install manual dimmers for now where needed, such as family room
Given the smart power packs, I cannot dim on the DC side, unless I replace the power packs (which is expensive).
In future, I plan to put some leading/trailing edge dimmers inline on the AC side of my relays (which will need an electrician) which I can control from an Arduino or embedded Linux device via a terminal block. This should be more convenient than replacing the power packs in the ceiling space and running lines to control the ATTiny devices.
Doors
Doors are complicated and have quite a few requirements.
- Need to also work with physical key
- Once in, door should be unlocked from inside
- Need to be fire-able from an Arduino
- Work with multiple smart inputs, e.g. RFID, pin pad
- Played with wireless rolling q-code, arduino can fire the remote (Jon Oxer has done this)
- Maybe pair this with deadlock and electric strike
- Perhaps use electronic door closers
I’m not sure what route I will take here yet, but it’s been cabled up and electronic strike plates are in place.
At this point I had a successful prototype which was ready to be rolled out across the house. Stay tuned for Part 3!

4 thoughts on “My Custom Open Source Home Automation Project – Part 2, Design and Prototype”
Hi,
Very interesting story!
I wonder what you’r doing with the controller.
I’ve read that you’ve chosen a Raspberry Pi with Fedora?
What kind of software do you want to use to control?
Are you buidling it by uyourself?
With MQTT and a RPi I’ve chosen for openHAB.
It’s very powerful but with v1 it took some time to learn.
Now with v2 it’s easier to use.
Regards,
Derk
In the last 24 hours I’ve been more and more dissapointed with how “open” open sources are. All the manufacturers want to sell you overpriced premium hardware and slick software to do their own cut down version of automatoin and then stick you with fees and charges all the way down if anything has to change.