In computing, a DMZ (demilitarized zone) is a method for separating untrusted traffic from a trusted network. One of the most common implementations of this would be for supporting a publicly accessible server (such as web) on a local internet connection. The server sits in the DMZ and can be accessed from the Internet, but it cannot access the trusted network.
OpenWRT probably needs no introduction, the brilliant open source and community driven Linux based embedded router stack. I run it on my Netgear WNDR3800.

I have an ODRIOD-U3 (little ARM box) running Fedora, which runs a web server. This is what I want to make publicly available in my DMZ.
So, how to create a DMZ in OpenWRT? Some commercial routers have a single button “make a DMZ” and everything is handled behind the scenes for you. Not so with OpenWRT; it’s powerful, transparent, and only does what you tell it to, so we have to create it manually.
Physical devices
My router has a bunch of physical interfaces:
- eth0 (switch)
- eth1 (ethernet)
- wlan0 (wireless card)
- wlan1 (5GHz wireless card)
The eth1 device maps to the physical WAN port on the back of the router. It’s important to note that the physical interfaces may differ from router to router, depending on the chipsets.
The Switch
The switch (eth0) includes a number of ports, including the four physical ones on the back of the router, a fifth one that’s not used, as well as one that connects to the CPU.
The switch supports VLANs (virtual LANs), and by default OpenWRT puts all of those ports into VLAN 1. This means that physical connections in those four ports at the back are on the same virtual switch and are able to communicate with each other. You can imagine that if I changed the VLAN of one of those ports to VLAN 10, that the device plugged into that port would no-longer be able to communicate with other devices on the switch. This is the basis for our DMZ.
That VLAN 1 actually creates a new interface on the router:
- eth0.1 (VLAN 1)
The configuration of the switch (including the mapping of ports to VLANs) is available under the switch menu, Network -> Switch.
Note: The port numbers on the switch in OpenWRT do not necessarily map in the right direction to the back of the router. In my case, port 0 on the switch is port 4 on the back of the router.
Creating a new VLAN
The first thing we want to do is create VLAN 10 and then assign one of the ports to that VLAN, removing it from VLAN 1.
- Browse to Network -> Switch
- Click Add to make a new VLAN entry
- Set this new entry’s VLAN ID to 10
- In the VLAN 1 row, change Port 0 to off
- In the VLAN 10 row, change Port 0 to untagged
- In the VLAN 10 row, change CPU port to tagged
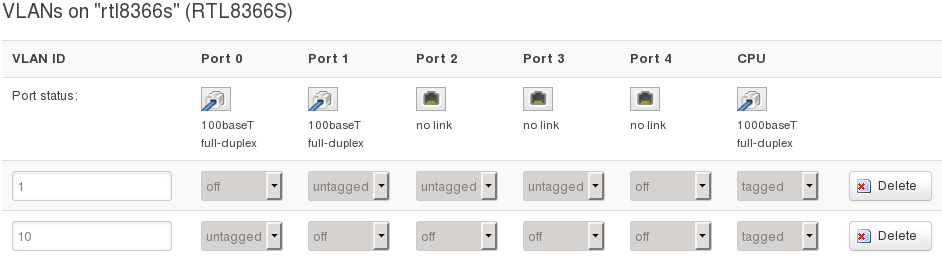
Setting VLAN to untagged tells the switch to add the appropriate VLAN tag to each ethernet frame as the traffic exits that port. The setting tagged means that the switch should expect that traffic leaving the port has already been tagged, perhaps by the operating system running on the device which is attached to the port.
Port 0 (port 4 on the back of the router) is now in VLAN 10, while the remaining three ports are in VLAN 1 and so it is now isolated from the others. The CPU is also in VLAN 10, else we would not be able to pass any traffic to port 0.
That new VLAN 10 creates a new interface on the router:
- eth0.10 (VLAN 10)
Interfaces
In OpenWRT you create virtual network interfaces which map to physical devices on the router. These are available under the Network -> Interfaces menu.
For example, my router has:
- LAN (for my internal local area network)
- WAN (for the external Internet connection)
One or more physical devices are attached to these zones, for example in my case:
- LAN (bridges VLAN 1 eth0.1, wlan1 and wlan0 together)
- WAN (eth1)
The LAN bridge creates a new interface on the router:
- br-lan (bridged LAN)
Creating a new interface
Once we have created our new VLAN, we want to create a new a interface for the DMZ. In the same way that the VLAN 1 device, eth0.1, is attached to the LAN interface, we will attach VLAN 10 device, eth0.10, to our new DMZ interface.
- Browse to Network -> Interfaces
- Click Add New Interface to make a new DMZ zone
- Set the name of the new interface to DMZ
- Leave the protocol of the new interface to static
- Ensure bridge over multiple interfaces remains unchecked
- For the interface, select only VLAN Interface: “eth0.10”
- Click Submit

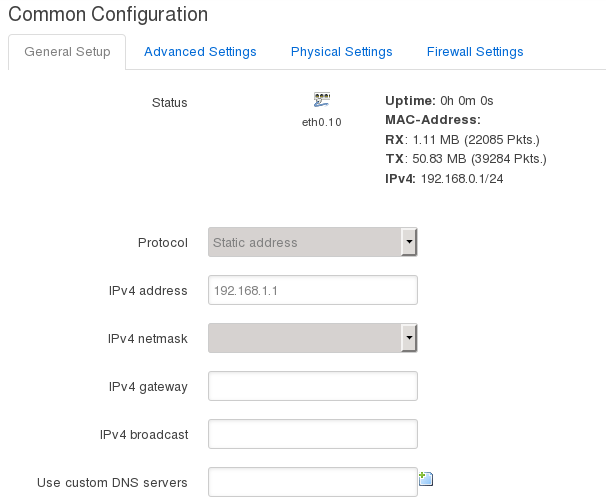
You should be presented with a new configuration screen for this interface.
- Set IPv4 address to something in a new range different to LAN, e.g. if your LAN is 192.168.1.1 then set DMZ to 192.168.0.1
- Choose a subnet that’s appropriate (often
255.255.255.0or/24which is 255 IPs) - Leave the rest of the settings blank, you do not need to set routes, or IPv6 if you don’t want to
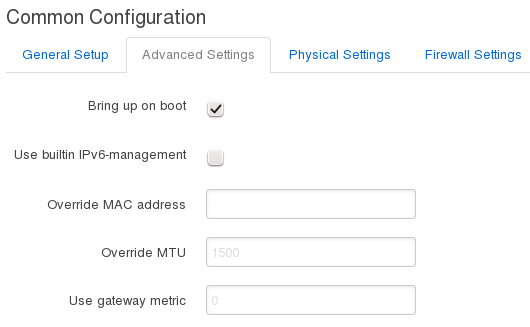
- Click on the Advanced Settings tab
- Ensure Bring up on boot is ticked
- If you don’t want IPv6, untick Use builtin IPv6-management
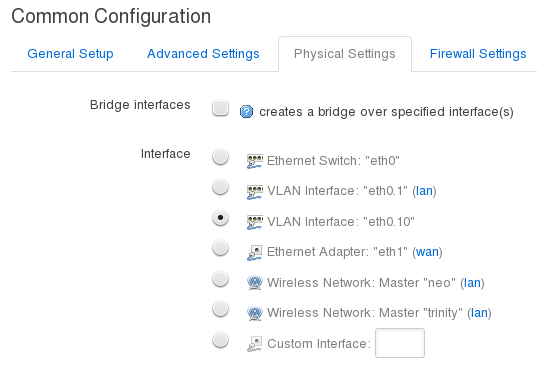
- Click on the Physical Settings tab, should already be set to eth0.10
- Click on the Firewall Settings tab
- Under Create / Assign firewall-zone select unspecified -or- create and type dmz
- Click Save and Apply

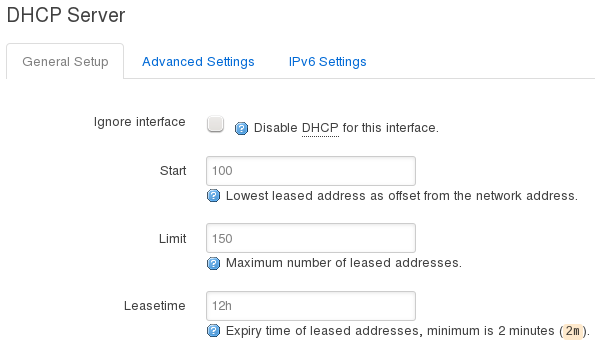
- If you want to run DHCP on your DMZ, then under DHCP Server click Setup DHCP Server button, leave default settings
We now have a new interface or zone called for the DMZ that’s set to use out DMZ VLAN. It has a new firewall policy assigned to it, dmz, which we now need to configure.
Firewall
Now we need to configure the firewall to do a few things:
- Allow the DMZ to talk to the WAN zone, so that devices can access the Internet
- Allow the LAN zone to talk to the DMZ, but not the other way around
- Add some traffic rules opening ports 53 and 67, so that devices from the DMZ can access DNS and DHCP services on the router’s DMZ IP address
- Finally, forward the HTTP port (80) from external internet WAN interface onto a device in the DMZ
Let’s do zone settings first.
- Browse to Network -> Firewall
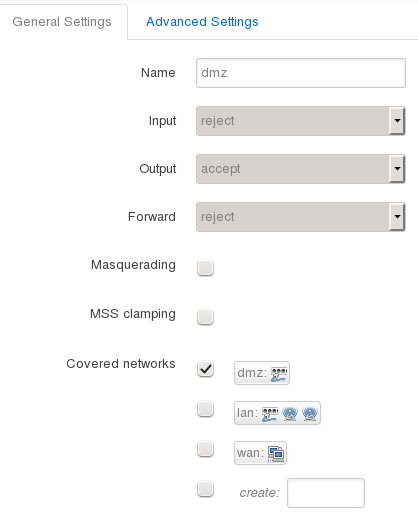
- Under the Zones section on General Settings page, edit the dmz zone
- Leave the name set to dmz
- Set input to reject, so that we drop all incoming packets by default
- Leave output as accept, although you could set this to reject by default but you’ll require specific outgoing rules as required (like for Yum updates)
- Leave Masquerading and MSS clamping disabled
- Under Covered networks ensure that only dmz is selected
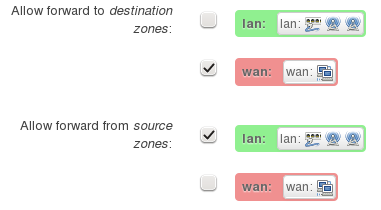
- Under the section Inter-Zone Forwarding, ensure Allow forward to destination zones is set only to WAN
- ensure Allow forward from source zones is set only to LAN
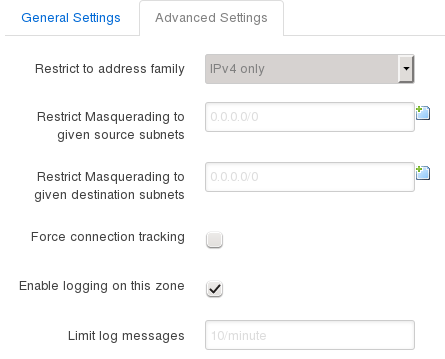
- Click Advanced Settings tab
- If you don’t want IPv6, you can set Restrict to address family to IPv4 only
- Tick Enable logging on this zone, so that we can see what’s happening
Now let’s do port forwards.
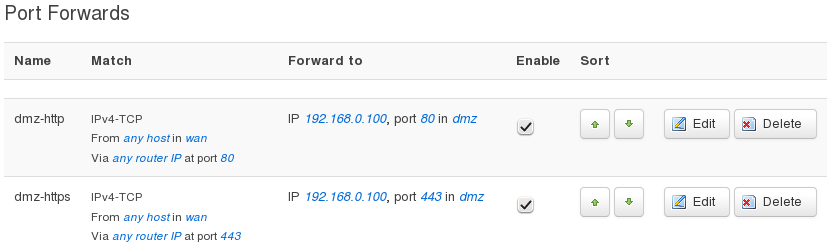
- Click on the Port Forwards tab
- Under New port forward section, give a name, such as dmz-http
- Set Protocol to TCP
- Set External zone to WAN
- Set External port to 80
- Set Internal zone to DMZ
- Set Internal IP address to your DMZ server, e.g. 192.168.0.100
- Set Internal port to 80
- Click Add when you’re happy
- Repeat for HTTPS port 443 if you want to run a secure server
Finally, let’s finish with traffic rules.
- Click on the Traffic Rules tab
- Under Open ports on router, click Add
- Set a name like dhcp-dns
- Under Protocol, select UDP
- Under Port, set 53
- Click Add
- Find your new rule in the list and click edit
- Set Destination address to your router’s DMZ IP address
- Repeat for DHCP port 67 UDP if you want to use router’s DHCP server, but don’t set the destination address as DHCP is broadcast

If you want to be able to ping the router from the DMZ clients, do this.
- Set a name like ping-dmz
- Set protocol to Other
- Click Add
- In the new configuration page, set Protocol to ICMP
- Set Match ICMP type to echo reply
- Set Source zone to dmz
- Leave Destination zone to Device (input)
- Set Destination address to your router’s DMZ IP address
- Click Save

Checking the logs
Remember we told the router to log the DMZ? Well now we can monitor the firewall rules by browsing to Status -> Kernel Log. Here you should be able to see any rejects that are happening, which is useful to work out why something isn’t happening as you expect on the DMZ.
For example, disable the dmz-ping rule and then try to ping the router from your DMZ server. Refresh the Kernel Log and you should see entries appear.
Testing
Plug in a device, see if it gets an IP address. Try to ping 8.8.8.8 (Google DNS server), then try to ping google.com.
Set up a web server on your DMZ box, or use netcat to listen on port 80. Get your external IP address from the router, or Google “my ip”. Now get a friend to browse to your IP and see if you see your web server.
Nice.
36 thoughts on “Creating a DMZ in OpenWRT”
Nice!!!
Thanks Christopher. Was looking for this kind of tutorial, simple and yet detailed and complete.
Thanks for this! Good stuff!!
Great tutorial!
Just a small correction; to enable PING the type of ICMP is echo-request not echo-reply
Thanks.
Thanks, exactly what I was looking for!
Very nice writeup. Stuff like this has tremendous value.
I tried what you did but now my ps4 which was the dmz ip address wont get internet connection. while it did before i tried this. could you know where my mistake could be?
I would suggest plugging a computer into the port and see what it looks like.
Does it get an IP address set? If not it could be dhcp problem so you need to check the firewall section about allowing DHCP.
Does it have a default route? If not, you can’t look up anything.
Does it have DNS set and does DNS work? If not, you might need to check the firewall section about allowing DNS.
the RX is 0. does this mean something to you? im sorry im not much of an expert. just trying to DMZ my ps4 to get NAT type open
Excellent tutorial. Thanks for sharing.
Good tutorial, but if the DMZ netmask was empty, all traffic has been blocked. After I set it (255.255.255.0) all gone fine!
Ahh thanks!
thanks for tuto this is what i need now
Hi,
Does DMZ VLAN make the other LAN ports can’t access the internet? I would like to have 2 separate networks on one router, one with access to internet and the other is for local intranet only ( no internet access).
No, those other ports should still work.
Hi,
I’ve followed your tutorial and everything works except my DMZ server timeouts when I run wget or apt-get update. Ping for both 8.8.8.8 and google.com issued on a server works so dns config is fine but it seems that firewall is somehow blocking other traffic :(. WAN -> DMZ and LAN -> DMZ connections are also fine.
Hmm.. maybe check your openwrt logs to see if there are packets being dropped? I assume you’re allowing all traffic between DMZ and WAN and not blocking anything external? If you can, maybe to a tcpdump on the router and see what’s happening with your packets. Maybe they are going out bt not getting NAT’d and so there’s no return traffic, or something.
Thank you Chris for this article.
I finally got a DMZ setup on my router (WNDR3800).
Just wanted to list somethings that caused me a problem… hopefully someone can benefit.
1. Interface Configuration picture: there are two ipv4 listed one is 192.168.0.1 and the other 192.168.1.1 – is confusing for newcomers like me.
2. I had to set the netmask – was causing me issues
3. Highly recommend setting up DHCP on DMZ – caused me issues.
I was setting up a minecraft server for my son in DMZ. Just
the port forwarding from wan to dmz did not work for me. I had to setup an additional port forward from lan to DMZ via the routers external ip(the ip that the world sees – google whats my ip). With just one rule(wan to DMZ), I couldn’t get to the server I had setup in DMZ. I could get to the server with the ip but not through the domain(myminecraft.ddns.net) from noip.com.
Cool and thanks for posting the issues you ran into, hopefully will help others.
How this tutorial should be modified, if I have 2 public IP addresses and 2 servers on separate sebnets?
I assume those would just be extra interfaces in OpenWRT and you could still create one or more DMZs and plumb them through to whichever network in the same way.
Thanks for the instructions……I just bricked my router!!!
Do you think I’m made of f***ing money, douchebag??
I’m talking to YOU.
Hi Mike, not sure if you’re for real, but the instructions I posted won’t brick your router, it’s just configuration. Also, most routers have a recovery method (using something like tftp) and instructions can often be found on the device’s OpenWRT wiki page.
can you be more specific please in traffic rules. i have these settings to fill on my router
Protocol
Source zone
Source address
Source port
Destination zone
Destination address
Destination port
Action
Hi Chaza, I guess that depends on what traffic you are wanting to allow through from the DMZ. Can you give me an example?
Hi again and thank you anyway. I have an console with static ip 192.168.0.100, and i make all the steps above as you describe. I want a nat type open. But, i dont understand what i have to do at traffic rules
If you want to NAT out (from your LAN/DMZ to the Internet) you don’t need port, you just need to allow the zone to forward. If you want to allow incoming traffic from the Internet to talk to a server in your DMZ, then you need to open the port in the WAN zone (from the Internet) and forward it to a port on your DMZ zone. This depends on the port you want to forward, so I can’t help you with that, but the steps are in the blog post, for example port 80:
If you are still stuck, maybe post what you’re trying to do exactly and the exact steps you’re trying and I’ll see if I can work it out.
Cheers,
-c
instructions unclear. lost here: “Under Open ports on router, set a name like dhcp-dns” what? create a new one? find an existing one? so confused. Can this all be done via ssh commands instead? it’s not easy to follow this guide. :/
Thanks. This would be for creating a new rule, so click “Add” to add a new one. Then give it a name depending on the type of traffic that you wanted to manage (in the example, I’m controlling dhcp and dns). I’ve added the `Add` step there, thanks.
When Creating a new interface, you should set a netmask (e.g. 255.255.255.0) otherwise it breaks your internet connection.
Thanks, I’ve updated it to set the subnet.
Great tutorial. Thank you so much!!
i have created the interface , network and firewall settings as mentioned but still dont know whether the DMZ is working or not. i have tried netcat but still its not conclusive to say DMZ is working ,because even after changing the host ip address still the web server continues on previous ip address. so please some method to test DMZ
Hi Shashank, the DMZ configuration allows the router to separate traffic from your LAN and another network using VLANs. So you should see two IP addresses on your router, one for the LAN and one for the DMZ (there will most likely be more, at least one for WAN). The web server for the router still probably listens on the LAN interface. For a client, it should be connected to the VLAN network for the DMZ – is your client configured on a VLAN, or plugged into a port in your router which is set to tag packets for the DMZ VLAN? What does your setup look like?